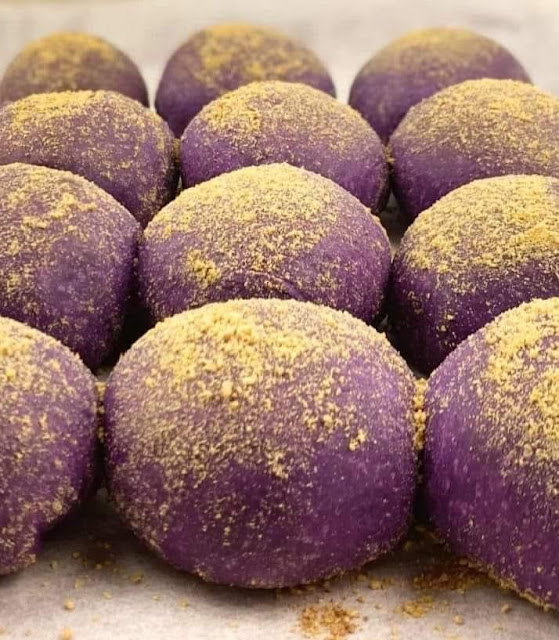
In the 2010's creative Filipino bakers added a healthier take to the humble pandesal they added a simple ingredient to it which is moringa/malunggay l
What is Pandesal?
A staple in a typical Filipino breakfast, the Pandesal or Pan De Sal is a type of pastry that is mainly composed of flour,yeast,egg and bread crumbs. This salty bread is said to be originally created by early Christian missionaries from the 1800's as a low-cost alternative to expensive baked goods.In the 2010's creative Filipino bakers added a healthier take to the humble pandesal they added a simple ingredient to it which is moringa/malunggay leaves. If you want to be more creative try adding some ube extract for a more distinct Filipino flavor I have personally seen and tasted some local bakeries selling Ube Pandesal.
2. In the mixing bowl, combine the dry ingredients: flour, sugar, salt, and baking powder then mix well.
3. Add the egg, butter, cooking oil, and yeast-sugar-milk mixture in the mixing bowl with the dry ingredients then mix again until dough is formed. You can use your hands to effectively mix the ingredients.
4. In a flat surface, knead the dough until the texture becomes fine.
5. Mould the dough and put back in the mixing bowl, cover with damp cloth and let the dough rise for at least 45 minutes to 1 hour.
6. After the dough has risen, transfer to a lightly floured working surface. Roll into a log then cut into four to six equal pieces. Take another portion of the dough, roll again into a log and cut into equal pieces, repeat this step until all the dough is done. If you want a heathier version add in malunggay/moringa leaves that is lighty shredded into tiny pieces.
7. Roll each piece of dough in breadcrumbs then arrange on a baking tray for at least an inch apart, you don’t want it sticking together when it rises later on.
8. Leave the dough in the tray to rise again for 15-20 minutes.
9. Pre heat the oven at 375 degrees Fahrenheit (190 degree Celsius) for 10 minutes. If using a fan assisted oven, reduced the heat according to instructor’s manual.
10. Bake for 20-25 minutes or until nicely browned outside.
11. You're done. Best eaten during breakfast.
Ingredients we need for this recipe:
- 2 cups all-purpose flour
- 2 cups bread flour
- 1/2 cup white sugar
- 5 tbsp. melted butter
- 1 tsp. baking powder
- 1 1/4 cup fresh milk (lukewarm)
- 1 pouch rapid rise yeast
- 1 cup bread crumbs
- 1 tsp. salt
- 1 egg
- 1 tbsp. cooking oil
Optional: crushed Malunggay/Moringa leaves ,Ube extract
Step by Step Cooking Procedures:
1.Combine the yeast, sugar, and milk and stir until the yeast and sugar are fully dissolved. I’ve chosen milk instead of water because it just tastes better, but you can always use lukewarm water instead of the milk.2. In the mixing bowl, combine the dry ingredients: flour, sugar, salt, and baking powder then mix well.
3. Add the egg, butter, cooking oil, and yeast-sugar-milk mixture in the mixing bowl with the dry ingredients then mix again until dough is formed. You can use your hands to effectively mix the ingredients.
4. In a flat surface, knead the dough until the texture becomes fine.
5. Mould the dough and put back in the mixing bowl, cover with damp cloth and let the dough rise for at least 45 minutes to 1 hour.
6. After the dough has risen, transfer to a lightly floured working surface. Roll into a log then cut into four to six equal pieces. Take another portion of the dough, roll again into a log and cut into equal pieces, repeat this step until all the dough is done. If you want a heathier version add in malunggay/moringa leaves that is lighty shredded into tiny pieces.
7. Roll each piece of dough in breadcrumbs then arrange on a baking tray for at least an inch apart, you don’t want it sticking together when it rises later on.
8. Leave the dough in the tray to rise again for 15-20 minutes.
9. Pre heat the oven at 375 degrees Fahrenheit (190 degree Celsius) for 10 minutes. If using a fan assisted oven, reduced the heat according to instructor’s manual.
10. Bake for 20-25 minutes or until nicely browned outside.
11. You're done. Best eaten during breakfast.


.png)
.png)

COMMENTS